PDF Attachments
As part of the IRS Modernized e-File program, some electronically filed returns can be transmitted with certain PDF attachments. Where the IRS or state allows, either specific PDF attachments are allowed or required. Some agencies also allow other PDF attachments to be made to the return. The program will offer the ability to attach PDFs where the agencies have allowed it.
Conditions that Must Exist to Add an Attachment:
- The return must have an EF Info Worksheet.
- If the PDF you want to add is a form, you must first add the form to the return. See Adding Forms to a Return.
- Remove password protection from any PDF you intend to attach in order to successfully e-file the return.
- The e-file must not be in a Transmitted or Accepted state.
Use Adobe Acrobat or another program to create the required PDF attachment. For instructions on removing password protection from your PDF files, refer to help for that program.
If you try to add an attachment after you've created an e-file (but have yet to transmit it), the system will prompt you to re-create the e-file.
Decide What Type of PDFs to Attach
Some forms that are required as PDF attachments may already be in your return as part of the normal tax return preparation process. See Creating and Attaching PDFs of Completed Forms.
Other required attachments might come from third parties (such as brokerage statements, property tax bills, etc.). See Creating and Attaching PDFs from Other Sources.
Creating and Attaching PDFs of Completed Forms
Creating PDFs of completed forms in the return:
Once you've completed the form within the return, you can save it as a PDF from within the return.
- From the open return, click the Print button.
The Print Return Dialog Box appears.
- Under the Select the copies you wish to print section, click the down arrow and select ATX 2015 PDF Print as your printer.
- Under the What do you want to print section, clear the check box for all the forms except the form you want to make a PDF.
- Click the Print button at the bottom of the dialog box.
The Save As dialog box appears.
- In the File name field, enter the name for the PDF form.
By default, the system will save the file under the return name. You can keep this name, or modify it to include the form number.
- Click the Save button on the Save As dialog box.
The Print Results dialog box will appear and close if printing is successful. If printing is not successful, you'll receive a message.
To attach PDFs of completed forms:
- From the open return, click the E-file menu; then, select Attach PDF.
If the Attach PDF menu item is disabled, the current return does not allow PDF attachments.

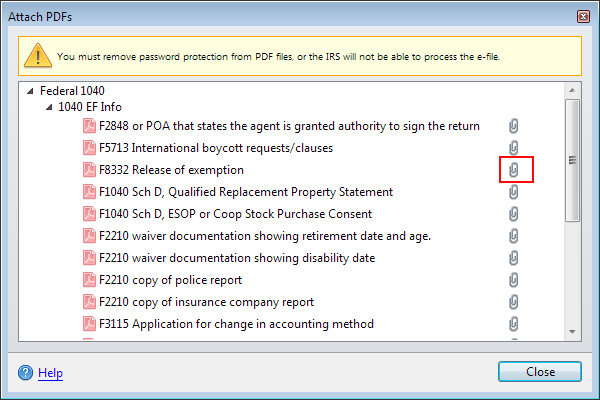
Attach PDFs dialog box
You can expand the Attach PDFs dialog box by dragging the right border of the dialog box to the right. This allows you to view long form descriptions.
- If the item you want to add is listed in the Attach PDFs dialog box, double-click the attachment (or, click the paper clip, outlined in red).
The Select PDF dialog box appears.
- Browse to the location where the PDF is stored.
- Select the file and click Open.
Most state and IRS programs require certain attachments to be given particular file names. The program will automatically enforce this naming policy if one of the pre-defined attachment options is selected.
The paper clip is replaced by the View button, Delete button, and the attachment size; which indicates that the item is attached.
ATX allows attachments up to 256K. For attachments larger than 256K you need to reduce the PDF file size by scanning the document at a low resolution or by using a 3rd-party PDF downsizing tool.

- Click Close at the bottom of the Attach PDFs dialog box.

- Click Continue.
- Follow instructions in Creating E-files to re-create the e-file.
Creating and Attaching PDFs from Other Sources
To create a PDF version of a paper document that you've received from a third party or via e-mail, scan the document to a PDF file.
Refer to your scanner or copier Help file for instructions.
To reduce PDF file size, scan documents no higher than 150 dpi and use black and white printing.
To attach PDFs of other documents:
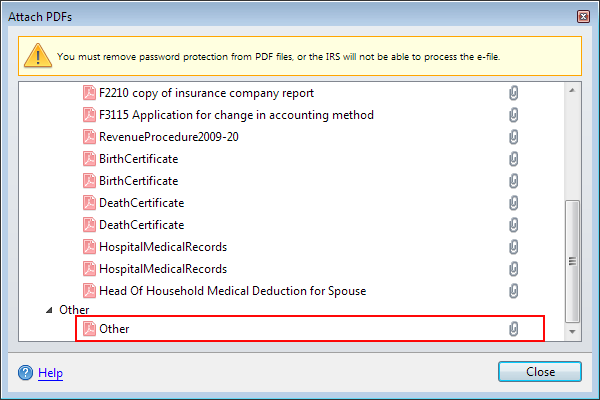
Other documents are any documents not specifically listed in the Attach PDFs dialog box.
- From the open return, click the E-file menu; then, select Attach PDF.
The Attach PDFs dialog box appears.
- Scroll down to the bottom of the dialog box and double-click the Other attachment.
The Select PDF for Other Attachment dialog box appears.
- Browse to the location where you've stored the PDF file.
- Select the file and click Open.
The Add Other Attachment dialog box appears.
- Enter the name for the other attachment and click OK.

Attach PDFs
- Click Close.
Viewing and Deleting Attachments
To view the attached PDF document:
From the Attach PDFs dialog box, click the View button next to the document you want to view.
To delete any attached PDF document:
- From the Attach PDFs dialog box, click the Delete button next to the document you want to delete.
The Remove Attachment message appears.
- Click Yes.
See Also: